How Can We Help?
Step 4-Adding a Desktop Gallery
Enable the Visual Builder

Click on the green ‘plus’ icon to add a new row below your last bit of content.


Click on Add from Library

Select the Desktop Project Gallery content block.


You will see some default gallery images appear-these are just random images taken from your media library.

Click on the cog icon in the grey controls that appear at the top of the row.
![]()
![]()
Define the number of images you wish to display in the gallery.

Click on the plus sign to add your images.

Select the images from your media library-you will see a ‘tick’ appear on the images you have selected.

Click on the Select button to confirm your selection.

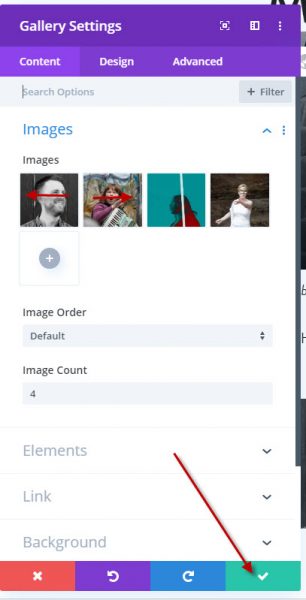
You will see the image thumbnails appearing in the gallery content block (and they should also be visible on the web page)-click on the ‘tick’ to confirm your selection.
Re-Ordering Images in the Gallery
At this stage you can re-order the display of images in the gallery by dragging and dropping the thumbnails in the desired order.
Deleting Images You gave previously Selected
If you hover over the thumbnail of the image you can click on the ‘trash’ icon to remove the image from selection.

Saving Your Content Addition
Click on the green Save button to update the web page.

Please note: If you don’t immediately see the green save button at the bottom right of the screen then click on the purple circle icon at the bottom centre of the screen-this will the expand all the controls to reveal the save button.
![]()
Exiting The Visual Builder
After you have saved your work go up to the black admin bar at the top of the screen. Click on Exit Visual Builder.

 You will now be returned back to the normal web page view.